How to Make Home-Made Kale Chips

Kale chips are a healthy and delicious snack. If you’re wondering how to make them look no further than here!

Supplies

To make kale chips you’ll need:

Oven

Bunch of kale

Baking sheet

Parchment paper or alternative (we use a silpat)

Olive Oil (one tablespoon)

Salt (one teaspoon)

Steps

Finished batch of kale chips!

Preheat the oven to 350 degrees Fahrenheit (175 degrees Celsius). Wash the kale thoroughly. If desired, split larger leaves into smaller pieces (I usually skip this step). After washing season the kale with olive oil and salt. Spread kale on baking sheet with parchment paper. Bake kale in oven for 20-25 minutes. If you like your kale extra crunchy put it in longer, if you like it more tender stick to shorter time frames.

You can serve your kale chips right away (I like them fresh) or store them in containers.

How to Raise Monarch Butterflies

Raising monarch butterflies is an incredibly fun and rewarding experience for all ages. When you take in a caterpillar you increase their chance of survival from around 10% to about 90%! And you get to take care of these cute little bugs!

Monarch Facts:

If you’re going to be raising monarchs it’s good to have a background on theif lifecycle. Monarchs start their lifecycle as an egg. In a few days they will hatch and become a minuscule caterpillar, smaller than the nail of your pinkie. The caterpillar will grow bigger and shed their skin five-six times during their caterpillarhood. After two weeks or so of being a caterpillar your caterpillar will hang in a “J” shape and shed their skin one last time becoming a green chrysalis. The caterpillar will stay in this stage for the next few weeks. Once the former caterpillar emerges they will be a fully formed monarch butterfly!

Monarch caterpillar’s diet consists solely of milkweed. Males can be distinguished from females by a distinct marking on their lower wings. Females lack these spots.

Supplies:

When keeping monarchs the most essential thing you’ll need is milkweed. You’ll need regular access to a plant that you can constantly harvest stalks from. Milkweed can come in various forms and can be bought online or at a nursery.

Designing your Monarch’s Habitat

There are various choices for your monarchs habitat including aquatic tanks, mesh hampers, cages meant for butterflies and more. When choosing your habitat consider the size of the stalks you’ll want to keep. When I keep monarchs I take stalks of milkweed around 18 in. long.

I use a reused an insect lore cage (that was used for painted ladies once) for my monarchs. On the floor of the cage I usually line it with some paper towels. Monarch caterpillars poop (known as frass) a lot so it’s easier if you have something underneath. I place the milkweed stalks in a jar of water so keep this in mind as well.

Finding Monarch Eggs/Caterpillars:

Here are some tips to find your own monarch eggs and caterpillars!

Try finding caterpillars and eggs in the spring or summer. Look on the underside of milkweed leaves to find eggs. Monarch’s generally lay eggs on the underside of leaves though you will occasionally find eggs on the top of leaves. If you’re looking for caterpillars see where there is a hole in the leaves. This might indicate their is a caterpillar near.

Monarch Caterpillars Upkeep:

Make sure your monarch caterpillars have a good amount of milkweed left to eat. Once your caterpillars get bigger they’ll eat a lot so you’ll have to replace it regularly. Clean the cage when it gets messy with frass. Replace your towels and change the water in your container. I like to take my caterpillars out and wash the cage with my hose outdoors.

Chrysalises:

Eventually your caterpillar will grow to around 2-3 inches and start hanging upside down in a “J” shape. They will become very still and hang their for a few hours before becoming their chrysalis. Some caterpillars choose to do this on the hood of the cage (the majority of mine do) while some will choose to chrysalize on a leaf.

Emerging Butterflies:

Approximately two weeks after being in a chrysalis a fully formed butterfly will emerge from the chrysalis. The chrysalis will become very dark and you will be able to see your monarch’s wings.

The butterfly will need to dry out their wings for several hours before being ready for release. After this several hour wait they’ll be ready to be freed! When freeing them make sure the temperature is above 60 degrees Fahrenheit and that it’s not raining.

Congratulations! You’ve officially raised a butterfly!

How to Care for Marimo Moss Balls

Marimo moss balls are surprisingly easy to care for. In this blog I will explain the basic care for them.

What are Marimo Moss Balls?

Marimo moss balls are actually a form of algae, not moss. Marimo balls can live for well over a century. They’re native to Japan and can live in fish aquariums (note that some fish have been known to devour theses). Marimos offer minimal filtration to your tank as well (though this is not significant and you still need a filter). Marimo balls are sometimes referred to as pets (I don’t understand why but you can consider your furry ball a pet!).

Where Should my Marimo live?

Marimo balls don’t like too much direct sunlight and will brown if getting too much. Choose a container that contains enough water to fully submerge your marimo. You should be able to remove the marimo from the bottle. You can put your marimo in a fish tank as well. If your worried about water spilling you can seal the container with a lid. Marimo balls don’t need oxygen so don’t worry!

Where can I buy Marimo Balls?

Marimo balls can be bought at your LFS (local fish store) or online. Personally, I bought my marimo balls from Amazon.

Note: If you want to place your marimo in an aquarium with other aquatics I recommend quarantining your marimos. Marimos have been infested with bugs before.

Some stores have been known to sell fake marimos. You can often differentiate between real and fake marimos by:

  1. Real marimos will usually float in water before sinking to the bottom of a tank.
  2. Real marimos will often have some brown blemishes (though a healthy one might not).
  3. Fake marimos might be perfectly round (real ones often are more spherical).

What Care does my Marimo Need?

Your marimo balls water should be changed every one or two weeks. Simply dump out the water and refill with tap or other water. If your marimo balls are in fish tanks do this during your routine water change. Give your marimo balls a light squeeze now. Try placing your marimo ball on a different side to simulate rounded growth.

Other Important Details

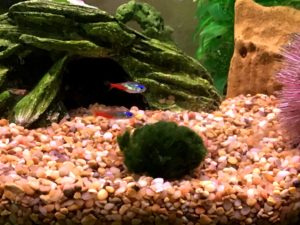
Two neons with a marimo.

Marimo balls can actually be kept out of water as long as they don’t completely dry out. Brown blemishes on your marimo usually indicates too much sunlight. Try moving your marimo to an area with less direct sunlight. I got four marimos about one and a half years ago, all with brown spots. Today, none of them have any brown spots.

Marimos balls will make an easy and fun addition to your tank. If you have any questions or comments feel free to post below.

How to Build a Backyard In-Ground Garden Pond with Waterfall

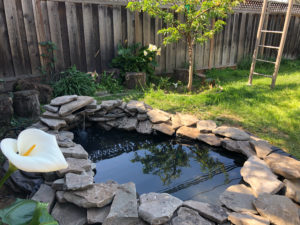
Building a in-ground pond is in reality, not that difficult. Look online for examples of ponds and try to base yours off of them or do something completely new! Here is a picture of our finished pond.

Note: The waterfall can easily be omitted if you skip a few simple steps. Adding other water features can be used as substitution.

This project can take as little as a few hours to much much, much longer (it took us a year to dig and a day to lay the liner, set up the filter and waterfall).

This pond is suitable for plants, fish and wildlife (remember to do your research if you plan on keeping different species together).

Part 1: Materials

Here are the materials needed to build your own backyard pond.

Liner: You can get really creative with this or just buy one from a store. Some people use things such as kiddie pools or even tires! Other unconventional options include water holding clay or stock tanks. If you plan on having fish make sure the liner/container is safe for fish. We got a flexible TotalPond liner which can be found on Amazon. Remember to decide how big your pond will be before buying your liner to avoid a costly mistake.

Underlayment: To protect your liner from being punctured you need to place something underneath. Sand or an old carpet will do (we used a carpet) though some places will sell underlayment.

Pump: Though it’s technically not required have a pump (given you don’t have a waterfall or other feature) I recommend getting one. If you plan on putting fish in your pond then you need a pump. We got a 330 GPH pump for a pond roughly 325 gallons (note the waterfall). Choose a pump based on the size of your pond, whether or not you will have fish/plants and if you desire a waterfall or other feature.

Filter: Again, not exactly required though I recommend and would require it for a fish pond. We got the TotalPond Universal Pump Filter Box that is compatible with any TotalPond fountain pump. Replacement filter media can be found here.

Rocks: We got some rocks off of Craigslist. You can get rocks in a variety of different places including rockeries. Make sure you have enough to line your pond (and anything else you want to do). Some leave this out but we didn’t like the sight of the black liner.

Waterfall Spillway (optional): This is required if you want a waterfall. The spillway collects the water from the pump and allows it to flow in a uniform manner. There are different sizes of spillway (twelve or twenty-four inch are common) that you can choose from. We got a twelve-inch spillway Total Pond Spillway. Note that the larger the spillway the faster the pump will need to work to maintain an adequate flow rate.

Tubing (optional): Tubing is necessary for waterfalls and various other features (such as spitters). The tubing connects from the pump to the spillway or feature.

Other Features (optional): If you want a different a form of aeration different than a waterfall you can choose to have a spitter or fountain. These will generally need a less powerful pump than a waterfall. A fountain will require a nozzle kit.

Misc. Decor (optional): Other forms of decor include lighting (including lit spillways), fake lily pads and animal statues.

Plants (optional): If you want you can have plants in your pond. Plants also provide oxygen as well as numerous other benefits. This article won’t go into much detail on plants.

Fish (optional): Whether your an experienced aquarist or completely new to the trade adding some fish will add more excitement to your pond.

Leveling Soil (optional): May come in handy if your area isn’t very flat.

Seating (optional): If you can’t sit by your pond then I don’t know what to say. Some nice seating will make your pond more enjoyable (I have some tree stumps).

Part 2: Constructing the Pond

Now that you have your materials you can begin the construction process. This process can take a while (digging the pond may be the longest step and was for us).

Before you start digging you’ll want to outline your pond with something (such as ropes or stakes). Once you’ve got the right shape you can start digging.

Tip: Always consider safety. If you have young children you may want a shallower pond or one with a fence surrounding it).

Tip: Add a ledge or two for plants or other features. Make sure you leave space for the filter box. A ledge will also provide a step if someone accidentally falls in your pond.

Tip: Keep some dirt for leveling later on.

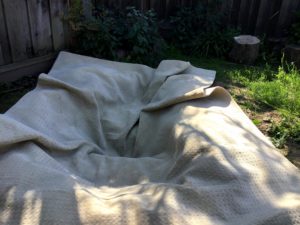
We tamped down the underlayment with our body weight.

Now lay the underlayment. If you are using something like a carpet then make sure you tamp it down.

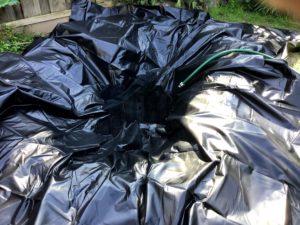
After laying the underlayment it is time to place the liner. If you are using a flexible liner make sure you try to flatten it out though know the water will help with this.

Image of filling the pond.
Before adding the filter box and pumps fill the pond halfway.

Now fill the pond around halfway full. Once you’ve done so you are ready to set up the filter box and pump.

If you have the Universal Pump Filter Box we have then you can follow these instructions. To set up the filter box you will need to open the box, take out the bio balls and filter media, run the media through the tubing and connect the tubing to the pump, stick the pump into the box, add the bio balls, tamp down the media and close the box. Stick the box into your half-filled pond. I recommend testing your pump right now.

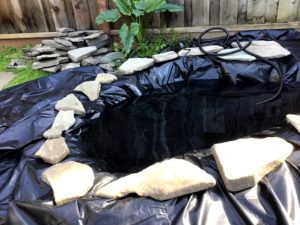
Picture of temporary rock formations..
Line the pond with rocks to help set the liner and for aesthetic.

If you have a fountain, connect the fountain nozzles to your filter box now.

Tip: If you plan on building a waterfall, skip to the steps below. Line the pond with rocks later.

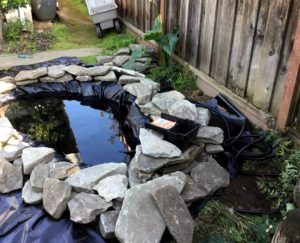
Continue filling your pond. Once you’ve finished begin to lay rocks. Congratulation! You’ve successfully built your pond!


Part 3: Adding the Waterfall

We forgot to take the wrapper off! You can obscure the tubing later.

After filling the pond you can start constructing the waterfall. Cut the tubing to your desired size and connect it to your spillway. Build the rocks around the spillway to hide the spillway (if you want a natural look). Get your waterfall to your desired height.

Before covering the spillway with heavy rocks test it to make sure the flow is level.

Tip: Use dirt or small pebbles to make your waterfall level. A small pebble can change the look dramatically!

Finish the look by covering your spillway with rocks. You’ve finished building your waterfall!

Part 4: Finishing the Look

Now that you have the basic part of your pond and waterfall finished you can finish the look with a spitter, fish, fountain, plants or substrate!

Connect the tubing to the spitter to start it on. Assemble the nozzle kit for a fountain.

Tip: If you have multiple features use may use an adapter to connect to each feature.

You can add a layer of mulch or other substrate to give a nice look. The substrate can help you grow plants around your pond.

Check to make sure the conditions of your pond are suitable to any plants you want. Also make sure they are legal in your area. If you have fish you may want to check compatibility (see the section below for more info) with other aquatics (koi are known to uproot plants).

You can add your fish as well now.

Now is a good time to hide your tubing and electrical cord. Use the substrate to your advantage here. Cut the liner and underlayment to help disguise them. Cut both just around your rocks.

Add an lighting fixtures to your pond. Arrange any pond/fairy garden supplies you want by your pond. Add fake waterlilies (if you have them) and arrange seating.

Part 5: Conclusions

In summation, building a pond is a nice way to bring joy to your yard. Use the tips above to create a lovely feature. Enjoy!

Our Pond:

Dimensions (approx.): 7ft. by 4ft. by 18in.

Liner (approx.): 10 ft. by 7 ft.

Underlayment (approx.): 8ft. by 10ft.

Volume (approx.): 325 gallons


Gifts for Harry Potter and Fantastic Beasts Fans

Finding gifts can be challenging. If you’re trying to find a gift for a potterhead look no further than here! Some of these are gifts for the Fantastic Beasts series while others are related to the Harry Potter series (and some are just related to the potterverse).

Niffler Plush:

Price: $22.70

Who doesn’t like a Niffler to snuggle with? The Niffler plush even has a pouch to store items! These official Nifflers will bring smiles to any potterhead.

Lego Harry Potter Video Game

If the person you would like to give a gift to is also a video game fan you can try a Lego Harry Potter video game! The game’s ESRB rating is Everyone 10+. Players play through the book’s story line as a variety of characters including Harry, Ron and Hermione. and experience it from a Lego standpoint. The game supports two players and is split between Harry’s 1st through 4th and 5th through 7th years.

Xbox 360 Years 1-4

Xbox 360 Years 5-7

Pickett

Price: $9.95

A bendable Pickett! This will bring to delight to HP fans and can make a great gift.

Hogwarts Library Collection

Price: $29.99 (hardcover)

The Hogwarts Library Collection features Fantastic Beasts and Where to Find Them (a guide to magical creatures, not to be confused with Fantastic Beasts and Where to Find Them the screenplay), Quidditch Through the Ages and The Tales of Beedle Bard. A great addition to a potterheads collection of Harry Potter related texts.

Harry Potter Themed Notebooks

Price: $9.95

These little notebooks are good for keeping track of information. Please note that these are notebooks and not spellbooks.

Harry Potter House Ties

Price: $14.99 (set of four)

These ties come in sets of four (one tie per house or four for one house) and can add to a Hogwarts student’s looks.

Golden Snitch

Price: $6.62

This Golden Snitch will go along great in a Harry Potter souvenirs collection. This can be a great add-on to another gift that will bring delight.

These gifts will bring smiles to potterheads and can add to an existing collection of Harry Potter items. Gifts can be hard to give but they are not impossible to give.

Ambition Mode

Ambition mode is one of the gameplay modes in Dynasty Warriors 8 (and it’s spinoffs). Most things in the second part of ambition mode will not be covered (the stuff after finishing the tongquetai which I believe was added in the Xtreme Legends expansion). You can find the game here.

Basics:

Here are basic things you should know if you’re playing ambition mode.

Starting the Game:

When you start a new game in ambition mode, it’ll prompt you to choose a character. It doesn’t really matter which character you choose but you should probably choose a character you like (and preferably has higher stats but you can still play on beginner mode) since you’ll be stuck with them for a bit.

Tongquetai: The main goal of the first part of ambition mode is to build the tongquetai and welcome the emperor to your side. To build the tongquetai you will need to upgrade the merchant, barracks, teahouse, and blacksmith all to level 50, recruit allies (400?), and earn fame (5000). Upgrading your facilities often takes the longest so prioritize upgrading them (more on that later).

Allies: You earn allies by defeating them in battles. When you defeat an officer they’ll join you (with the exception of mock battles but those aren’t unlocked until after completing the tongquetai) if you haven’t reached your maximum number of officers yet. When you recruit allies you’ll be able to unlock new facilities. Playable officers who are your allies can be played if you switch characters.

Fame: Fame is earned in unconventional battles (it might be earned in other ways too, I don’t know), by completing missions such as defeating an assassin or rescuing handmaidens. If you pause the battle there should be a tab for missions. The amount of fame you have will determine the number of allies you can have. The maximum amount of fame your allowed depends on the facilities you have (excess fame is discarded).

Materials: Facility materials upgrade facilities and weapon materials can be used at the blacksmith (more on that in facilities). To upgrade facilities, press the touch pad and go to camp management. Weapon materials and facility materials can be traded at the merchant at a rate of 1:2 and 1:1 after maxing out the merchant.

Weapons: (Most of this information applies generally to all of the game, not just ambition mode.) Weapons are an integral part of the game. You can earn more weapons by defeating officers and picking up the dropped weapon (a brownish box or for playable officers, their weapon). In ambition mode, you can change your officer’s weapon by going into officer info. In battle, weapons can be switched by pressing the L1 button.  Some weapons possess skills that’ll have benefits you battle (like health gauge recovery when fighting or a defense increase). It’s recommended at least one of the weapons you use is your officer’s favorite weapon so you can use EX attacks. You can have a maximum of 1200 weapons. To collect more weapons you can sell weapons at the blacksmith in ambition mode and at camps in story mode. (I’ve found that selling weapons can earn you a sizable amount of gold.)

Animals: Officers will already have a default animal (e.gadow Runner for Cao Cao) that they ride. You can get animals in battle, from the barracks, winning consecutive battles (more on that later), completing the tongquetai, and buying them from the merchant. Some animals can be rode (horses, bears, elephants etc.) while others are companions (tigers, falcons, etc.).

Gold: Gold is the in-game currency. Gold is used to buy weapons, animals, food from the teahouse, animal feed, and deploy troops. Gold can also be earned by selling weapons and animals and battles.

Bodyguards:

In the game, you can have a maximum of three bodyguards. Each bodyguard has a special skill that you can use once per battle. There is a maximum fee (30 to begin) you can have for your character that is increased through leadership EXP. Leadership EXP is earned by sending your bodyguards on tasks. Playable characters will have a larger fee than generic officers (31-33 versus 1-14).

Bonds: Your bond with an officer increases when you have them as a bodyguard (bonds might increase in other ways as well, I don’t know). Officers have bonds with both male and female officers that must be leveled up independently. You can unlock affection lines and earn gems by increasing your bonds with a character. When you reach the maximum bond level your bodyguards will will have a new skill they can use. You will also unlock the all of a playable officer’s ambition mode lines (accessed through the gallery) by maxing out their bonds with both male and female officers.

Battles:

Gate: Go to the gate to start battles in ambition mode. When you talk to the gatekeeper you’ll get to choose the battle difficulty, battle type and battleground. The in-game tutorial will show you the battles but they are listed below:

Great Battles: These battles are great for earning allies.

Unconventional Battles: These battles prompt you to complete missions which will earn you fame. These missions also earn you time which is helpful if doing consecutive battles (more on that later).

Skirmishes: Skirmishes are short battles that can be done quickly and are good for earning materials. You can still earn fame and recruit allies through skirmishes but on a smaller scale.

Duels: Duels are battles where playable officers will appear. Duels will appear after you have done between 2-4 consecutive battles.

Mock Battles: Mock battles are unlocked after completing the tongquetai. These battles will have you fight against your own officers. Your officers won’t drop weapons and these battles can be used to unlock conversation lines.

In ambition mode, battles have a time limit of 7 minutes. You can earn more time by defeating officers (30 seconds), for every 50 KOs (30 seconds), completing missions (2 minutes), and using the gather supplies bodyguard skill. You can have a maximum of fifteen minutes in battles.

Consecutive Battles: You can do multiple battles in a row with out returning to camp. When you do so your health gauge is not returned to 100%, your time limit is not increased and the difficulty increases. Doing multiple consecutive battles can earn special animals and weapons (see miscellaneous).

Facilities:

Facilities will appear after you reach a certain number of allies. You’ll start with the blacksmith (and gate) and build the rest later.

Supervisors: Supervisors really don’t do much (with the exception of the training ground and farmer’s supervisors). If you speak to a supervisor they will say something about the facility they’re at. You need to have a supervisor at the training ground or it’s useless and it’s good to have one for the farmer since the supervisor will occasionally give materials (facility and weapon materials). Note that there is a maximum number of supervisors you can have at facilities and you may have to move them around.

Here is a list of the facilities and what they do:

Blacksmith: At the blacksmith you can sell, buy and do other things with weapons. You can reforge weapons to make stronger weapons as you increase the blacksmith’s level (at level one you’ll only be able to buy and sell). Selling weapons provides gold and can help fund barracks trips.

Teahouse: The teahouse provides food which has a multitude of effects. When buy food you’re officer will have a short-term advantage in battle such as a health gauge increase to quicker musou gauge recovery. More food options will appear as the level increases.

Barracks: The barracks allows you to deploy troops. You can send troops (up to 10,000 gold’s worth of troops) to a single province. When you come back from battle check back at the barracks and you’ll receive rewards. Rewards include animals, allies, weapon and facility materials, and weapons. You’ll still receive rewards after searching the area 100%.

Farmer: The farmer will provide gold for you after you complete a battle. I recommend having a supervisor here since they’ll occasionally provide materials (speak to the supervisor, they will occasionally say something other than their normal line). Speaking to the farmer will give you gold.

Merchant: The merchant allows you to exchange, sell and buy objects. You can trade one weapon material for two facility materials until your merchant reaches level 50. It’s recommended you only upgrade your merchant to level 50 after finishing the other facilities for the tongquetai. Discounts and the available items will increase as you upgrade the merchant.

Training Ground: The training ground requires a supervisor for it to do anything useful. If you don’t have a supervisor there, you might not notice it’s there (I didn’t) too. The supervisor will gain EXP as you fight battles and will level up over time. You can assign characters you dislike playing as to the training ground to level them up. The amount of EXP gained will increase as the training ground’s level increases.

Stable: The stables house different animals that can be fed to reap rewards. Rewards include, animals, weapons, and materials. Different animals like different types of feed. Feed costs between 100-1000 gold. More feed becomes available as you level up.

Academy: At the academy you can buy EXP, health, attack and defense boosts. These are permanent and can be beneficial for leveling up characters you hate playing as but want at at high level. More items become available as you increase the level.

Miscellaneous:

Completing 30, 60, 90 and 100 consecutive battles:

Shadow Runner, Hex Mark, Red Hare and War Elephant are earned by winning consecutive battles. Shadow Runner is earned by completing 30 consecutive battles, Hex Mark is completed by completing 60 consecutive battles or 30 consecutive battles and another 30 consecutive battles. Red Hare is earned by completing 30 consecutive battles three times or 90 consecutive battles (or 60 consecutive and another 30). I have not earned the War Elephant but it is earned by completing 100 consecutive battles.

To complete consecutive battles, I recommend choosing one of your high level officers and playing on beginner mode. The game difficulty increases as you win consecutive battles so playing even on easy mode can be difficult. I recommend playing unconventional battles to earn time (you earn two minutes from each mission) if you’re low on time. 

Completing five consecutive battles will also earn you special weapons. Note that you will only get the animals if you haven’t reached the maximum animal quantity. I recommend selling some animals at the merchant before leaving for battle. You can release animals into the wild during battle, so I also recommend around battle 29 or 99 to release one or two animals.

That’s all for my blog post! Thanks for reading!


Girl Scouts Junior Aide Requirements

You must be a girl scout junior to earn the junior aide award. You can earn the junior aide by helping daisies or brownies earn a journey, badge or help out at a outing.

Requirements:

1. Find a group of brownies or daisies to work with

 2. Organize times, dates, and locations to work on badges or journeys.

3. Work on a journey or badge with the younger girls. You must help out for at least 3 meetings or equivalent. You could also help out at a outing.

You can find the badge here.

Sources:

     1.   Girl Scout Junior Guide to Girl Scouting (here)

Great Books for 5th Graders

We made this list using arbookfind.com for ATOS reading level and commonsensemedia.com for maturity level.

Books for 5th Grade Reading Level, age 9 or older

Number the Stars by Lois Lowry, Newbery Medal, ATOS 4.5, age 9+

Bud, Not Buddy by Christopher Paul Curtis, Newbery Medal, ATOS 5.0, age 9+

The Phantom Tollbooth by Norton Juster, ATOS 6.7, age 8+

Where the Red Fern Grows by Wilson Rawls, ATOS 4.9, age 9+

A Wrinkle in Time by Madeleine L’Engle, Newbery Medal, ATOS 4.7, age 9+

D’Aulaires’ Book of Greek Myths by Ingri d’Aulaire, ATOS 6.6, age 8+

The Lightning Thief: Percy Jackson and the Olympians, Book 1 by Rick Riordan, ATOS 4.7, age 9+ – better if already familiar with Greek mythology

The Sea of Monsters: Percy Jackson and the Olympians, Book 2 by Rick Riordan, ATOS 4.6, age 9+

A Little Princess by Frances Hodgson Burnett, ATOS 6.0, age 9+


Books better for readers that are also age 10+ maturity level:

Where the Mountain Meets the Moon by Grace Lin, Newbery Award, ATOS 5.5, age 10+

The Westing Game by Ellen Raskin, ATOS 5.3, age 10+

Harry Potter and the Goblet of Fire by J. K. Rowling, ATOS 6.8, age 10+

Harry Potter and the Order of the Phoenix by J. K. Rowling, ATOS 7.2, age 10+

Hatchet by Gary Paulsen, Newbery Honor, ATOS 5.7, age 11+

Harry Potter and the Half-Blood Prince by J. K. Rowling, ATOS 7.2, age 11+

Harry Potter and the Deathly Hallows by J. K. Rowling, ATOS 7.2, age 12+